Friday, July 8, 2016

Stampin'Up! Fresh Fruit Summer Tote Thank You Gift

Hello and Welcome to my Blog!
Today I am sharing a Summer Tote Thank You Gift made with the Stampin'Up! Fruit Stand Suite collection. My inspiration was the Water Infusion Bottles that are so popular lately. Fresh Water infused with Fresh Fruit, I think this can be a great oh so healthy Thank you gift for anyone! And the Fruit Stand Suite collection is perfect to create all kinds of cards and gift packaging.


To make this 3D fruit I stamped the strawberry image from the Fresh Fruit stamp set and cut it out an extra 1/8" larger. Since it needs to be symmetrical you cut it out in half to create a template, place this template (half of strawberry) on a folded piece of cardstock, trace and cut 8 pieces, then attach them side by side. For the leaves I used the Blossom Bunch larger flower. I embellished it with some Dazzling Diamonds and thick whisper white twine.


Here are some Instructions how to build the Tote Bag:
I cut a piece of Designer Paper 11" X 12" ( being the 11" the width of bag). 
Score on the 12" side at 1/2, 4-1/2, 7-1/2, 11-1/2. Fold the 1/2" scored lines towards the inside of the bag ( this is optional for a better finish on top edge of your tote) see picture above.

Draw a line 1/2 inch wide on both the edges of your tote bag this is where you will add some Tear and Tape Adhesive.

Cut 2 pieces of coordinating card stock at 3-1/2 X 11 and score on short side at 1/2". Score on long side at 4" and 7". Attach the pieces on each side of the main bag body overlapping at the 1/2" score line, as you see on picture above.

After attaching both pieces cut or snip the center tabs to the scored line only and glue these tabs to form the box.

You will end up with this rectangular box.

If you are using brads to attach the handles then you will adhere the top folded edges until you add the brads that hold the handles this way they will be covered nicely underneath.

Make a mark at center of bag and punch with a circle punch I used the 2" circle punch.

Attach your handles and then you adhere the folded edges in place.

The finished Tote Bag measures 11 wide X 4 tall X 3 deep.  The Note Card is 3 X 3.

I hope you like this project idea as much as I do, it really looks so cute and attractive once you see it finished.  I am planning to make more of these Summer Tote Bags for gifts using the coordinating colors of  the Fruit Stand Designer Paper. 
If you would like to shop for any of these Stampin'Up products please visit my Stampin'Up website HERE. Or click on any of the images in the supply table below.
Thank you so much for visiting and Have a Wonderful Weekend!

Friday, July 1, 2016

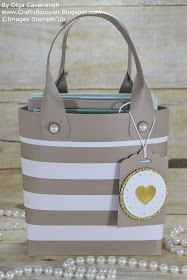
Paper Pumpkin June 2016 Banner Surprise Alternatives

Hello and Welcome to my Blog!
Today I would like to share with you some alternatives for the Paper Pumpkin Banner Surprise kit.
 
 I always wanted to make a set of shaker cards and The Banner Surprise kit includes enough supplies to create plenty of shaker cards with envelopes and a bag too...if you like! 

This Video Tutorial from Stampin'Up! will help you to see how simple these shaker cards can be done!  I used some framelits and a little extra card stock to make four cards, and I used the two extra card bases to make the Tote Bag. 


To make the Tote Bag I followed this Video Tutorial by LeeAnn Greff. 
Here are some instructions to make this Paper Pumpkin Tote Bag:
- Cut a piece of cardstock Tip Top Taupe color 7" X 4" and scored it 1" from each side to form the base of bag.
- I attached the 2 card bases from the short end and I cut about 1" from one of the ends, you will end up with a long piece of an approximate 15-3/4" long X 5-1/2" high. I attached this long piece around the bag base (since the card bases come with already punched notches make sure you attach this long piece with the notches towards the top, these notches will be covered with strips of Tip Top Taupe card stock.
- I cut one strip at 1" X 11" and another at 1" X 5" attaching them to complete the outside trim of bag. At this point I attached the handles since I used brads then I attached the inside trim piece. Repeat the same dimensions for the inside trim of bag. The Handles were made with 2 strips of Tip Top Taupe card stock 1" X 11" and scored in center ( Do not scor these strips all the way to the end). I used the corner punch to round the corners and attached them to bag with brads or anything you like.

I really like the way the set of shaker cards came out. This can be a beautiful birthday gift or any other occasion gift. I am planning to use the banners and leftover supplies for other projects.
I hope you liked these alternatives and found some inspiration. 

For those of you who are not familiar with Paper Pumpkin please watch the following video tutorial for the Paper Pumpkin June 2016 Banner Surprise Kit.

Paper Pumpkin comes in once a month beautifully packed with light blue tissue paper, and all the supplies and instructions needed for you to start creating.


If you would like to Subscribe for Paper Pumpkin and learn more about it, please click Here and don't forget to select Olga Cavanaugh as your Demonstrator. Or if you would like to shop for any of the Stampin'Up supplies used here please visit my Stampin'Up website Here
Thank you so much for visiting and Have a Wonderful Day!