Wednesday, September 28, 2016

Stampin'Up October 2016 Promotions!

Hello Dear Friends!
I just wanted to give you some heads up about Stampin'Up October Promotions.  World Card Making Day is October 1, and In celebration of this day, Stampin'Up is offering 25% OFF select cardmaking essentials. This promotion is only October 1-5, 2016. You don't want to miss out this opportunity to stock up on these supplies! Please click HERE to check the items that are being discounted, or click the image at the right hand side of this Blog.

Header_WCMD_Demo_Oct0116_NA


Also in addition to this promotion, during the entire month of October 2016, you can buy three packages of Designer Series Paper and get one FREE!! This is great news ! I love using Stampin'Up Designer Series Papers for almost all my projects! Please check out the list of qualifying Designer Series Papers HERE or click the image at the right hand side of this blog.
B3G1DSP_DemoHeader_NA

Thank you for stopping by and please visit again for more ideas and inspiration.


Wednesday, September 21, 2016

Stampin'Up Fresh Fruit Note Cards and Gift Tags Set

Hello and Welcome!
Today I am sharing another project made with the Stampin'Up Fresh Fruit stamp set and Fruit Stand Designer Series Paper. I also used the lemon image from A Happy Thing stamp set which was a Sale-A-Bration item and it is now retired, however I wanted to incorporate this image in the gift set since lemons are the theme for this gift.
I made this gift as a Thank You for a very special family and great friends of ours. They have a fruit garden and they have shared these amazing lemons with us! The green lemons you see on the pictures are real, home grown by them, the lemons are super juicy, green for now however they will turn yellow very soon thus they are the inspiration for this gift. Enjoy!
The stationary box is 5-1/4" X 6".  See Instructions below to make this box.


I used Whisper White Note Cards and Envelopes and the Layering Ovals framelits dies. For the tags I used Whisper White Thick card stock cut at 3-1/2" X 2" and punched with the scalloped tag topper.

Stationary Box Instructions:
Box Base: Cut a piece of card stock at 7-1/4" X 8" and score it at 1" on each side fold scored lines and assemble the box base. 

Box Lid or Cover: You need a piece of card stock (color of your choice) 12" X 6-1/2". Score on the 12" side at 5-1/2 and 6-1/2. Fold the score lines, Round the 4 corners and attach this piece to the box base leaving 1/4" allowance around your base.
Cut another piece of card stock same color as your box lid 2" X 6-1/2" and round 2 corners. I cut 2 pieces of ribbon about 8" long each piece. Attach one of these pieces to the top edge of lid placing the ribbon on center in between these pieces. Repeat the same for the bottom section of the box lid.

Divider: Cut a piece of coordinating card stock at 5-1/4" X 4" and score on the 4" side at 1", 2" and 3" Fold score lines in a mountain valley way add adhesive between your mountain section, this will form the divider as you seen on picture above.

I hope you liked this Note Card and Gift Tag set idea.
Visit my Stampin'Up Website HERE to shop for the supplies used for this project.
Thank you so much for visiting and Have a Wonderful Day!


Thursday, September 8, 2016

Paper Pumpkin August 2016 Bold Botanicals Alternatives

Hello and Welcome to my Blog!
Today I am sharing some alternatives for the Paper Pumpkin August 2016 Bold Botanicals. When I first saw the supplies and coordinating colors, perfect to use with the new Stampin'Up Copper embossing powder! I knew I wanted to make a set of cards and a Box with a little bit of a Western look, and this is what I came out with.


For the Gift Card Holder I wanted to create a bigger package, here I placed the gift card pocket inside a  4" x 5"note card. 


I also made a very simple box (with a little Western look) for the cards using some of the stamps, colors and supplies in the kit.


I hope you liked these alternative ideas and found some inspiration to create your own. Paper Pumpkin kits are so much fun to create since includes all the supplies and instructions to make a set of cards or if you have extra materials you can make your own alternatives too!

If you would like to subscribe to Paper Pumpkin with me, please click HERE This is a great time to subscribe since Paper Pumpkin is offering a Buy One Get One FREE promotion until October 10, 2016. 

Thank you so much for visiting and Have a Wonderful Day!


Thursday, September 1, 2016

Stampin'Up Santa's Sleigh - Handmade for the Holidays

Hello and Welcome to my Blog!
Today I am sharing with you some project ideas made with the Stampin'Up Santa's Sleigh stamp set and thinlits dies Bundle. This set was one of my favorites from the new Holiday Catalog and I would like to show you how versatile this bundle is.  I already see lots of great projects made by other talented demonstrators using this set and I am sure you can make some great projects with it too!


This is a Christmas Countdown and Slide Easel Card. It is a standard size of 5-1/2 X 4-1/4. I used a 1" silver ring to hold the 12 number tags.


This is another Christmas Countdown and Slide Easel Card made with more traditional Christmas colors in Cherry Cobbler and Gold. 


This is a ZFold card, I got the inspiration from another demonstrator on the web. These awesome card you can make in any color combination you like :)

You can watch a video tutorial from Dawn's Stamping Thoughts HERE. On my card here I changed the dimension of the panels as follows:
Cut two Crumb Cake cardstock pieces at 2-1/2" x 4"
Cut one Crumb Cake cardstock piece at 5-1/4" x 4"
Cut two Whisper White cardstock pieces at 2-3/8" x 3-7/8"
Cut one Whisper White cardstock piece at 5" x 3-7/8"
Cut the Pop Up Piece on Whisper White cardstock at 1" x 10" Score it at 5" and 7-1/2". Attach this piece over the Whisper White Left and Right panels only.


I also created several 5X5 3D Gift Card Holders. I think the recipients will have so much fun opening these gift card holders and they can be displayed on your desk or mantel during the entire Christmas season. 


They can fold flat and fit nicely inside an envelope to mail out.


This is another idea for a 3D Gift Card Holder with a nice Christmas snow scenery :). This card size is 5-1/2" X 4-1/4" and it folds flat and can be mailed out in a standard envelope.


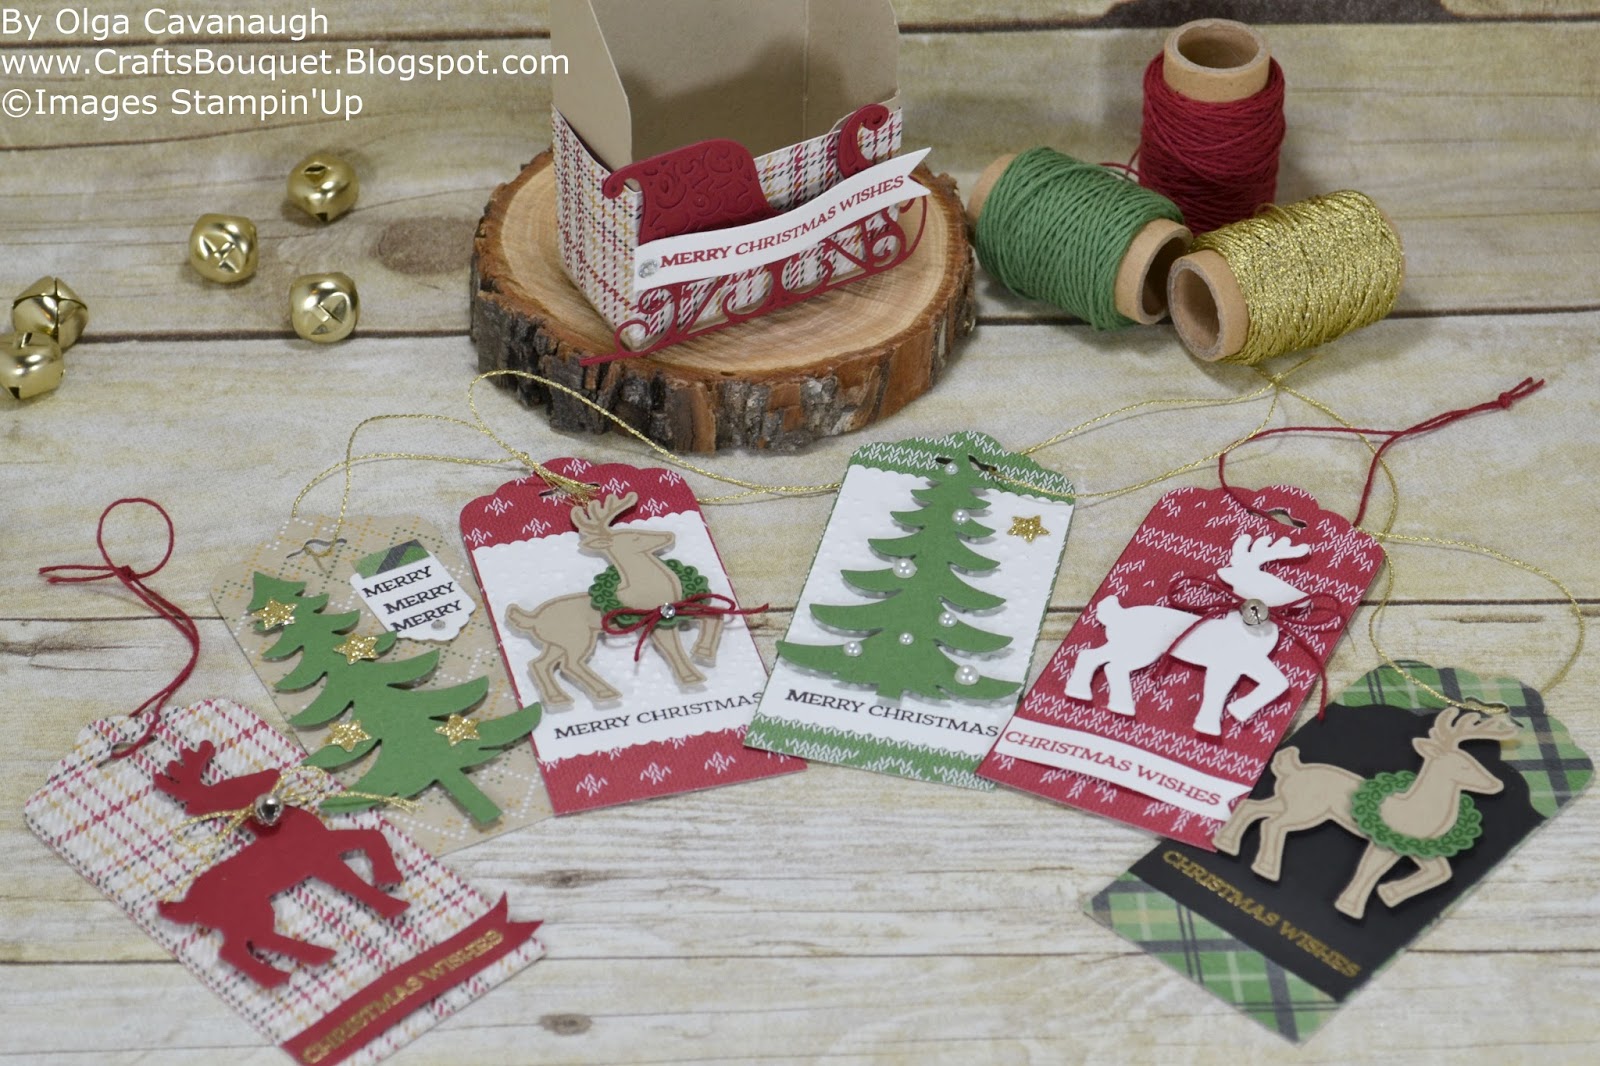
This is a set of 6 Christmas tags and a box. The box was made using the Gift Box punch board. The Tags are 4-1/2 X 2 inches, perfect size to fit the images in the Santa's Sleigh stamp set and thinlits bundle.

Here is a Picture with instructions on how to build this box. 


All the supplies used for these projects are available in the new Stampin'Up Holiday Catalog.

I hope you liked these project ideas and found some inspiration to make your own projects and handcrafted gifts in preparation for the Holiday Season.
If you would like to shop for any of these products please visit my Stampin'Up Website Here. Or click on the Holiday Catalog images on right side of the Blog.

Thank you so much for visiting and Have a Wonderful Day!