Sunday, October 18, 2015

Stampin'Up Lighthearted Leaves Card Set and Baker's Box

Welcome to my Blog!
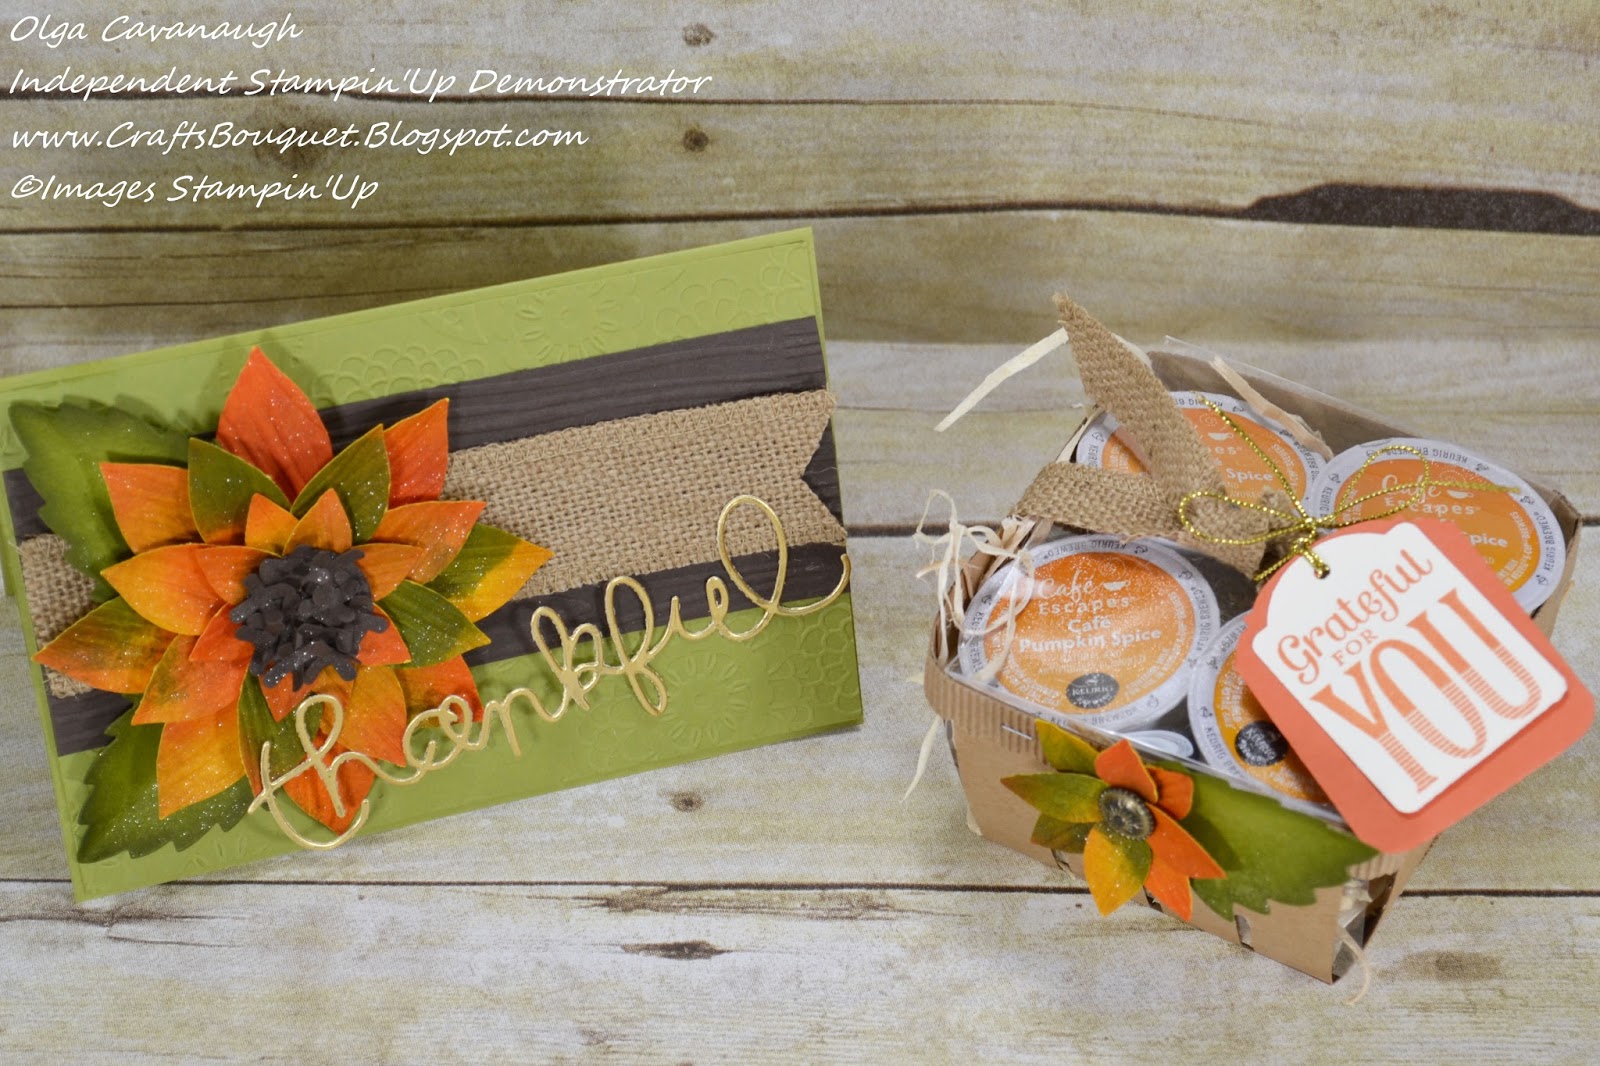
Today I would like to share with you this Thanksgiving Card set made with the Stampin'Up Lighthearted Leaves Stamp set and the Baker's Box thinlits, using the 2014-2016 In Color Collection card stock and Ink pad kit.


 This set is so easy to make, the card size is 4-1/4 X 5-1/2 and for each card you need the following:
-For Card Base cut a piece of 4-1/4 X 11 and fold in half.
-For second layer cut a piece of same color card stock at 4-1/8 X 5-3/8 and emboss this piece with the Boho Chic embossing folder.
-Cut one piece with the largest dies from the Lots of Labels framelits in the same color of card base and stamped it with gold ink using one of the Gorgeous Grunge stamp images.
-Cut one piece with the second largest from the Lots of Labels framelits in Very Vanilla card stock and stamp a couple of leave images one with the same ink color and the other one using Sahara Sand ink color to contrast, then splatter this piece with a mix of All purpose glue and water using the aqua painter then sprinkle it with gold stampin glitter. The glitter splatter technique was demonstrated at a Stampin'Up convention and you can find many videos on YouTube that show this technique.
-Emboss the images with gold embossing powder on the same color card stock, I sponged the edges with same ink colors for more dimension. Then cut them with the coordinating Leaflets Framelits dies. I attached these leaves to center of card using dimensionals.
Embellish these leaves with coordinating ribbon and a gold accent, I used the Gold Basic Metal Buttons.


I am pairing these cards with the Baker's Box filled with Rasberry Jam butter cookies, to give away as Thanksgiving gifts for teachers, family and friends.

For the tag I used the following:
Stamp the Autum sentiment from the Among the Branches stamp set using same ink color as the card. I used the 2" circle punch for this image.
Cut another circle with Gold Foil paper using the 2-1/2" circle punch for background of your tag.
Stamp 2 leave images from the lighthearted leaves stamp set one in same color ink of card and another leave with sahara sand ink color and do the splatter technique with glue and water mixture and sprinkle with gold glitter.
Add ribbon to embellish your tag as you see on picture above.

I hope you like these Thanksgiving card and box gift sets, and I hope the recipients like them too!
If you would like to shop for any of the Stampin'Up supplies used for this project please click the items on the moving carousel or visit my Stampin'Up Website Here.
Please let me know if you have any questions or write me a comment below.
Thank you so much for visiting and Have a Wonderful Day!

Built for Free Using: My Stampin Blog

Thursday, October 15, 2015

Stampin'Up Another Festive Flower Card and Thanksgiving gift basket set

Hello and Welcome to my Blog!
Today I am sharing with you another Festive Flower Card and Gift Basket set in Blackberry Bliss color.

For instructions on how to build the Sunflower in this card please refer to my previous post Here.
The Ink colors I used for the flower petals are these:
Old Olive
Rich Razzleberry
Blackberry Bliss
Delightful Dijon
Crushed Curry
The large leaves are made with Old Olive card stock.

For the Card Base I used the following supplies:
-Piece of Blackberry Bliss card stock cut at 8-1/2 X 6-1/2 score at 4-1/4 and fold to form the card  base.
-Piece of Blackberry Bliss card stock cut at 4-1/8 X 6-1/4 and emboss with Lovely Lace embossing  folder.
-Piece of Delightful Dijon card stock cut at 2 X 6 and emboss with Woodgrain embossing folder.
-Piece of Burlap Ribbon cut at 5-1/2 in. long, cut the end to create a banner.
I used Gold glimmer paper for the sentiment on this card.

 
For the basket and flower I used the same technique from previous post.  The tag was made using the Ornate Tag topper punch with Blackberry Bliss card stock to create a background piece, then I used the Note Tag punch in Very Vanilla for second layer, and final I used the Tag Talk stamp set and Label Bracket Punch for sentiment, I also embellished this tag with a Basic Rhinestone and Gold Trim Cording and I tied a bow around basket using the 5/8" Blackberry Bliss Striped Cotton Ribbon.

I really love the warm look of these Thanksgiving gift sets, and I hope the recipients will like them too!
If you would like to shop for any of the supplies used for this project please click on the items in the moving carousel or visit my Stampin Up website HERE.
Thank you so much for visiting and Have a Great Day!

Built for Free Using: My Stampin Blog

Wednesday, October 7, 2015

Stampin'Up Festive Flower Card and Thanksgiving Gift Basket set

Welcome to my Blog!
Today I would like to share with you a Thanksgiving Gift Set made with the Stampin'Up Festive Flower Builder Punch and the Berry Basket Bigz die.
The Festive Flower Builder Punch was designed to build a poinsettia flower, however I wanted to show that you can use this tool for many other projects using different colors with as many or just a few petals as you wish.


This card size is 4-1/4 X 6-1/2. I created a Sunflower with different fall colors mixed up, the "Thankful" letters were cut with Gold Foil paper and they are from the Expressions Thinlits dies (this item is retired) however you can substiture this sentiment with any of the new thinlits currently available in our catalog. The card has a piece of early espresso that I embossed with the Woodgrain embossing folder, and I added another layer of Old Olive card stock to card base and embossed it with the Lovely Lace embossing folder to coordinate with the sunflower, I also added some burlap ribbon.

To pair the Card I wrapped a few Pumpkin Spice Keurig cups using the Berry Basket Bigz die, I used Kraft card stock for the base of basket and corrugated paper for the top scallop border, I also added some burlap ribbon to tie a knot around basket, the tag is made with very vanilla card stock and used the Merry Everything stamp set, I cut another tag with Tangerine Tango card stock for background. The small flower on  the basket is made with the leftover petals from the sunflower above so nothing got wasted :)
For those of you who are not familiar on how to build the Berry Basket please watch this video tutorial HERE.

Below are some pictures that will show you how I inked, punched and build the Sunflower on the card.
 I used 2 strips of Daffodil Delight card stock  cut at 2-1/2 X 11 and I blended the ink colors as you see on picture (Delightful Dijon, Old Olive, Tangerine Tango, and Tangelo Twist)

After punching all petals, I embossed them with the Woodgrain embossing folder.

You will need 8 of larger petals then glue them on a 1-3/8 circle to form first layer.

Add 8 medium size petals as second layer see picture above for placement.

To build the center of Sunflower I used a 3/4" circle with Early Espresso card stock and punched 12 of the "X" shaped pistils, glue all these shapes around the circle until is covered completely.
I used another 3/4" circle and assembled another small flower using 4 of the smaller petals.

I attached the small flower on center of big flower with a dimmentional for a third layer.

Then I attached the center with another dimmentional to finish the Sunflower.

I cut 2 leaves from the Leaflets Framelits using Old Olive card stock and sponging the edges, I also folded in half to add texture.

Attach the leaves to the back to finish the Sunflower.

I hope you like this project and decide to make some for you or to give away, I had so much fun building these flowers, and they come out so pretty and attractive you are going to want to show case this card on your mantel for the entire Thanksgiving season:) 

If you would like to shop for any of the Stampin'Up products used for this project please click on the items in the moving carousel or visit my website Here.

Please let me know if you have any questions or write me a comment below.
Thank you so much for visiting and Have a Great Day!
Built for Free Using: My Stampin Blog

Friday, October 2, 2015

SEPTEMBER 2015 PAPER PUMPKIN: WICKEDLY SWEET TREAT

Welcome to my Blog!
Today I am so excited to share with you my first Paper Pumpkin Kit, I absolutely love it!
This is my version of the September Paper Pumpkin which I will give away to a Wonderful Lady who is a Friend, amazing Mom and a Talented 4th grade teacher, . I wanted to keep it just like the original design.   I wrapped it with clear celo paper in purple colour to match the tags, I also used one charger from Hobby Lobby as a base for this basket. 

Now check out the Paper Pumpking September 2015 VIDEO


The next pictures are some other ideas you can use to create different projects by using the same kit supplies. 


The following is some information on how you can Sign Up for paper Pumpkin and join the Fun every month!
Paper Pumpkin is a: fully designed project kit that  arrives in a delightful box filled with stamps, ink, and paper—everything cut and ready to go so you can skip to the fun. Just think of it as creativity in a box. The cost is 19.95 per month + Tax shipping is included in the cost. Click Here to Sign up for Paper Pumpkin ! Choose a Demonstrator near you or I will be so happy if you choose me as your Demonstrator: Olga Cavanaugh

To show  support for Breast Cancer Awareness Month, Paper Pumpkin is going PINK . . . or at least our October boxes are! And because we know our subscribers want to share the love too, we will be making a donation on their behalf to the Breast Cancer Research Foundation (BCRF).
Stampin' Up! will donate:


Here's how you can help: 
Subscribe! If you're new to Paper Pumpkin, click here to get started. Your first kit will arrive in a limited-edition pink box that you'll want to hold onto forever-and we'll donate $2 because you're new!

Please contact me if you have any questions,
Thank you so much for visiting and Have a Great Day!


Thursday, October 1, 2015

End of Summer 2015 Cards and Projects

Hello and Welcome to my Blog!
Before I start posting Fall cards and projects I would like to close the Summer 2015 with some cards and boxes I have been working on.

This card was made for a Girl who loves navy blue colour and also loves music and her Dog. I used the retired SU Dress up framelits dies and the SU Spiral Flower die for the roses the leaves are from the Flower Frenzy Die.


This is another music card I used the Watercolor Wings stamp set and the colours are Bermuda Bay and Soft Sky, the flowers are made with the Pansy Punch and Petite Petals Punch.


This is one of my favorites, this box was made with the Stampin Up Gift Box Punch Board the dimmensions are 4 X 4 X 2.5, I sponged with Blushing Bride ink to reveal the embossed flower on paper, the flowers are made with the Bouquet Bigz die.


These 2 last cards were made with retired Stampin up Label Card thinlits, I used the Perfect Blend stamp set (retired) and Ballon Bash stamp set.

I hope you have found some inspiration to create. To shop for Stampin'Up products please visit my website HERE.
Thank you so much for visiting and Have a Great Day!