Wednesday, October 7, 2015

Stampin'Up Festive Flower Card and Thanksgiving Gift Basket set

Welcome to my Blog!
Today I would like to share with you a Thanksgiving Gift Set made with the Stampin'Up Festive Flower Builder Punch and the Berry Basket Bigz die.
The Festive Flower Builder Punch was designed to build a poinsettia flower, however I wanted to show that you can use this tool for many other projects using different colors with as many or just a few petals as you wish.

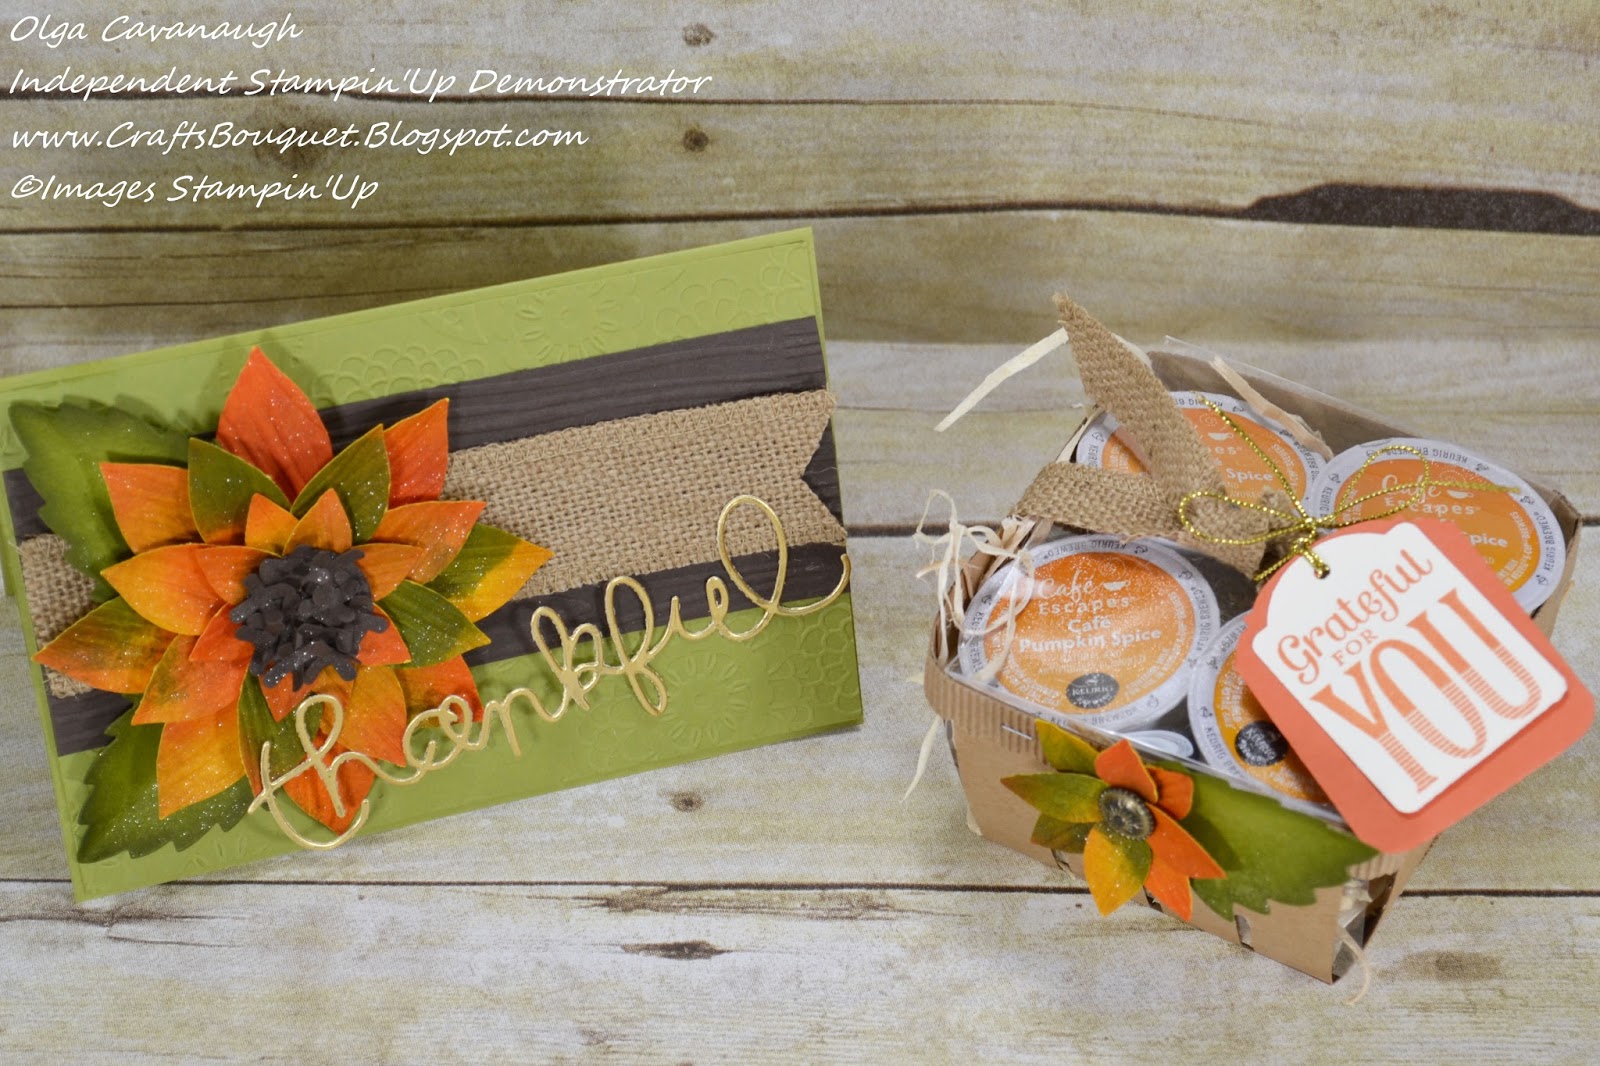

This card size is 4-1/4 X 6-1/2. I created a Sunflower with different fall colors mixed up, the "Thankful" letters were cut with Gold Foil paper and they are from the Expressions Thinlits dies (this item is retired) however you can substiture this sentiment with any of the new thinlits currently available in our catalog. The card has a piece of early espresso that I embossed with the Woodgrain embossing folder, and I added another layer of Old Olive card stock to card base and embossed it with the Lovely Lace embossing folder to coordinate with the sunflower, I also added some burlap ribbon.

To pair the Card I wrapped a few Pumpkin Spice Keurig cups using the Berry Basket Bigz die, I used Kraft card stock for the base of basket and corrugated paper for the top scallop border, I also added some burlap ribbon to tie a knot around basket, the tag is made with very vanilla card stock and used the Merry Everything stamp set, I cut another tag with Tangerine Tango card stock for background. The small flower on  the basket is made with the leftover petals from the sunflower above so nothing got wasted :)
For those of you who are not familiar on how to build the Berry Basket please watch this video tutorial HERE.

Below are some pictures that will show you how I inked, punched and build the Sunflower on the card.
 I used 2 strips of Daffodil Delight card stock  cut at 2-1/2 X 11 and I blended the ink colors as you see on picture (Delightful Dijon, Old Olive, Tangerine Tango, and Tangelo Twist)

After punching all petals, I embossed them with the Woodgrain embossing folder.

You will need 8 of larger petals then glue them on a 1-3/8 circle to form first layer.

Add 8 medium size petals as second layer see picture above for placement.

To build the center of Sunflower I used a 3/4" circle with Early Espresso card stock and punched 12 of the "X" shaped pistils, glue all these shapes around the circle until is covered completely.
I used another 3/4" circle and assembled another small flower using 4 of the smaller petals.

I attached the small flower on center of big flower with a dimmentional for a third layer.

Then I attached the center with another dimmentional to finish the Sunflower.

I cut 2 leaves from the Leaflets Framelits using Old Olive card stock and sponging the edges, I also folded in half to add texture.

Attach the leaves to the back to finish the Sunflower.

I hope you like this project and decide to make some for you or to give away, I had so much fun building these flowers, and they come out so pretty and attractive you are going to want to show case this card on your mantel for the entire Thanksgiving season:) 

If you would like to shop for any of the Stampin'Up products used for this project please click on the items in the moving carousel or visit my website Here.

Please let me know if you have any questions or write me a comment below.
Thank you so much for visiting and Have a Great Day!
Built for Free Using: My Stampin Blog

Friday, October 2, 2015

SEPTEMBER 2015 PAPER PUMPKIN: WICKEDLY SWEET TREAT

Welcome to my Blog!
Today I am so excited to share with you my first Paper Pumpkin Kit, I absolutely love it!
This is my version of the September Paper Pumpkin which I will give away to a Wonderful Lady who is a Friend, amazing Mom and a Talented 4th grade teacher, . I wanted to keep it just like the original design.   I wrapped it with clear celo paper in purple colour to match the tags, I also used one charger from Hobby Lobby as a base for this basket. 

Now check out the Paper Pumpking September 2015 VIDEO


The next pictures are some other ideas you can use to create different projects by using the same kit supplies. 


The following is some information on how you can Sign Up for paper Pumpkin and join the Fun every month!
Paper Pumpkin is a: fully designed project kit that  arrives in a delightful box filled with stamps, ink, and paper—everything cut and ready to go so you can skip to the fun. Just think of it as creativity in a box. The cost is 19.95 per month + Tax shipping is included in the cost. Click Here to Sign up for Paper Pumpkin ! Choose a Demonstrator near you or I will be so happy if you choose me as your Demonstrator: Olga Cavanaugh

To show  support for Breast Cancer Awareness Month, Paper Pumpkin is going PINK . . . or at least our October boxes are! And because we know our subscribers want to share the love too, we will be making a donation on their behalf to the Breast Cancer Research Foundation (BCRF).
Stampin' Up! will donate:


Here's how you can help: 
Subscribe! If you're new to Paper Pumpkin, click here to get started. Your first kit will arrive in a limited-edition pink box that you'll want to hold onto forever-and we'll donate $2 because you're new!

Please contact me if you have any questions,
Thank you so much for visiting and Have a Great Day!


Thursday, October 1, 2015

End of Summer 2015 Cards and Projects

Hello and Welcome to my Blog!
Before I start posting Fall cards and projects I would like to close the Summer 2015 with some cards and boxes I have been working on.

This card was made for a Girl who loves navy blue colour and also loves music and her Dog. I used the retired SU Dress up framelits dies and the SU Spiral Flower die for the roses the leaves are from the Flower Frenzy Die.


This is another music card I used the Watercolor Wings stamp set and the colours are Bermuda Bay and Soft Sky, the flowers are made with the Pansy Punch and Petite Petals Punch.


This is one of my favorites, this box was made with the Stampin Up Gift Box Punch Board the dimmensions are 4 X 4 X 2.5, I sponged with Blushing Bride ink to reveal the embossed flower on paper, the flowers are made with the Bouquet Bigz die.


These 2 last cards were made with retired Stampin up Label Card thinlits, I used the Perfect Blend stamp set (retired) and Ballon Bash stamp set.

I hope you have found some inspiration to create. To shop for Stampin'Up products please visit my website HERE.
Thank you so much for visiting and Have a Great Day!

Friday, September 4, 2015

Stampin' Up Cottage Greetings Card Kit

Welcome to my Blog!
Today I am sharing another idea with the Stampin'Up Cottage Greetings Card Kit.
This kit is my favorite, it includes all the supplies needed to create 15 Cards, 5X5 in size and all the envelopes with amazing silver foil linings super gorgeous die cuts and many more embellishments. The card bases are so thick making these cards look so elegant and perfect to create Beautiful Gift Sets. Please note that customers will need to purchase the coordinating Cottage Greetings stamp set and some ink pads, available in our annual Stampin'Up catalog or contact your demonstrator for optional classes where these items will be supplied for you to complete your card kit. 

Here I have created 5 card sets, each box contains 3 card designs. I have made some modifications to the original designs but used the same accessories.


To build your box you will need the following:
For the Box Base:
Cut a piece of Very Vanilla card stock at 7-1/2 X 7-1/2 and score it at 1" on each side, fold these score lines cut and adhere the flaps to assemble the base of the box.

For the Box Lid:
Cut a piece of Window Sheet just add 1/16 " to the base dimmensions and assemble in the same way.

For the Box Belly Band:
I used 24 in. of the Dotted Lace Trim in Mint Macaron. Tie a single bow and add any embellishments you prefer, in this case I used the petite petals punch and some Pearl basic jewels.

I hope you like this idea! write me any comments or questions below.
Thank you so much for visiting and Have a Wonderful Day!

To order any of these supplies Click the items in the moving table below or go to my Stampin UP website Here.


Built for Free Using: My Stampin Blog

Tuesday, August 18, 2015

Paper Pumpkin Promotion and New Video August 2015 Paper Pumpkin kit Reveal


If you've never tried Paper Pumpkin, now is a great time-get 50% off your first two months.
Offer Dates: July 23-September 10, 2015

Offer Details: Use the code HALFOFF to join Paper Pumpkin before September 10, 2015, and get 50% off the first two months! After that, keep the creativity coming for only $19.95 + tax per month (shipping included). 

The Fine Print:
  • For new subscribers only.
  • Available for month-to-month subscriptions, not prepaid subscriptions.
  • Discount applied to one kit per month for the first two months of a new subscription. After the first two months, the price for each month's kit will go to the regular price: $19.95.
  • You need to visit PaperPumpkin.com to join.
  • Enter the Promo Code, HALFOFF when you sign up.
  • New subscribers must join by Thursday, September 10, 2015; 11:50 PM (MT).
Click Here to learn about how to add a PaperPumkin subscription to your next Stampin'Up order and start getting your monthly artistic fix all in one box. It is Simple, Easy and Fun!

Get Past Paper Pumpkin Kits! is never too late to join Paper Pumpkin and get the past kits! They are only available to current Paper Pumpkin Subscribers.

I hope you love Paper Pumpkin as much as I do!
Thank you for visiting and Have a Wonderful Day!
Olga Cavanaugh


Tuesday, August 4, 2015

Stampin' Up Garden In Bloom and Hello Honey Gift Set

Welcome to my Blog!
Today I am so excited to share with you this Garden in Bloom card and a Hello Honey Hexagonal box Gift set.

The Garden in Bloom stamp set along with the English Garden Designer Series Paper and the 5/8" Striped Cotton Ribbon make so many great projects by combining these products.  One of the elements that cought my attention was the Bee on the stamp set and also on the papers super cute!. All these Stampin' Up products had everything I needed to wrap some honey bottles and honey dippers in such a cute way.


This box was an inspiration from the Tall skinny Hexagonal Box by Pootles.Co.UK, you can watch her video HERE to get familiar with assembly procedures.  However the box I made here is shorter and has a lid to close. The dimmensions of finished box are 4-1/2" tall by 3" wide.
This is what you need:
LID

For the Lid cut a piece of card stock 9-3/4 X 3. Score on the long side at: 1-1/2, 3-1/8, 4-5/8, 6-1/8, 7-5/8, and 9-1/4.  Score on short side at 2". snip all the tabs (2" sections) and remove the small 2 x 1/2 inch section as shown on picture above. Fold score lines add adhesive to 3 of the tabs, intertwining to form the top of lid. I used the 2-1/2 circle punch to cut a circle out of the English Garden Designer Series Paper and I attached it to top of lid, I also cut a piece of the 5/8" Striped Cotton Ribbon in Hello Honey color to embellish the lid.

BOX

For the Box cut a piece of card stock 9-1/2 X 6-1/2. Score on the long side at 1-1/2, 3, 4-1/2, 6, 7-1/2, and 9. Score on short side at 2". snip all the tabs (2" sections) and remove the 2 x 1/2 inch section as shown on picture above. Fold scored lines add adhesive to 3 of the tabs and follow the same procedure as you did for the lid to assemble the box.
Decorate as desired.
I hope you liked this project and find some inspiration to create some gifts of your own, to order any of these products please click HERE. Or the product table below.
Thank you so much and Have a Wonderful Day!


Built for Free Using: My Stampin Blog

Sunday, June 7, 2015

Stampin' Up Best Thoughts in the New 2015-2017 In Colors

 Welcome to my Blog,
Today I want to share with you this set of cards size 4-1/4 X 5-1/2 made with the Stampin'Up Best Thoughts Hostess stamp set.
I absolutely fell in love with this stamp set and the sentiments font style. I used the Shimmery White card stock and the aqua painters and used all the new 2015-2017 In Colors to Water color the images that I first stamped with Staz On jet black ink. This watercolor technique was demonstrated at one of the 2015 Stampin Up Conventions. I also embellished the cards using the new 1" Dotted Lace Trim that comes in all the new In colors as well, and I added some Basic Rhinestones and Pearls, the black and white piece is from the Neutrals Collections Card Stacks.
I made the envelopes using the Stampin UP Envelope Punch Board and the New Envelope Paper also available in all the new 2015-2017 In colors.


On the picture below I made the gift bag using the New Stampin Up Gift Bag Punch Board. The bag size is Medium and I used one sheet of 8-1/2 X 11, being the 8-1/2 in. the high of the bag. I added a piece of the new coordinating envelope paper to front panel and punched holes with my crop-a-dile to attach the new coordinating lace trim. I used the instructions provided at the  Stampin Up Blog to create this bag in a different ways Click Here to see the different ways you can create with the Gift Bag Punch Board.


 I really love the way this bag turned out, it is so elegant and classy...and is ready to be packed with these delicious Mint Macarons I baked for first time so I apologize for they are not so perfect :) but they still taste so good, you have the crispiness on the outside and the chewy inside with the mint filling and you will end up savoring the rich almond flavor at the end...


This is another idea to use the Best Thoughts stamp set.  I colored the images with Bermuda Bay Ink color using same technique and paper I mentioned above. The Gift Bag was made with the New Stampin Up Gift Bag Punch Board, I used a piece of 12" X 10 " . Scored 2" on top of bag and folded it back to show the other side of paper, I punched the holes with my Crop-a-dile for the handles and used the stampin up whisper white satin ribbon. I glued a string of Bermuda Bay sequin around bag. The Flower was made using the New Cotton Paper Assortment in Bermuda Bay color I cut six flowers from Floral Frames Collection Framelits, I stacked all layers together and stapled the center in a cross way, then scrunched each layer up, it is very easy and it stays in place !

I hope you liked these ideas and get some inspiration to create your own gift sets.
Thank you so much for visiting and Have a Wonderful Day!

Here is the list of supplies I used for these projects:

Built for Free Using: My Stampin Blog