Saturday, April 23, 2016

Paper Pumpkin All About Everything Set of Note Cards and Gift Bag

Hello and Welcome to my Blog!
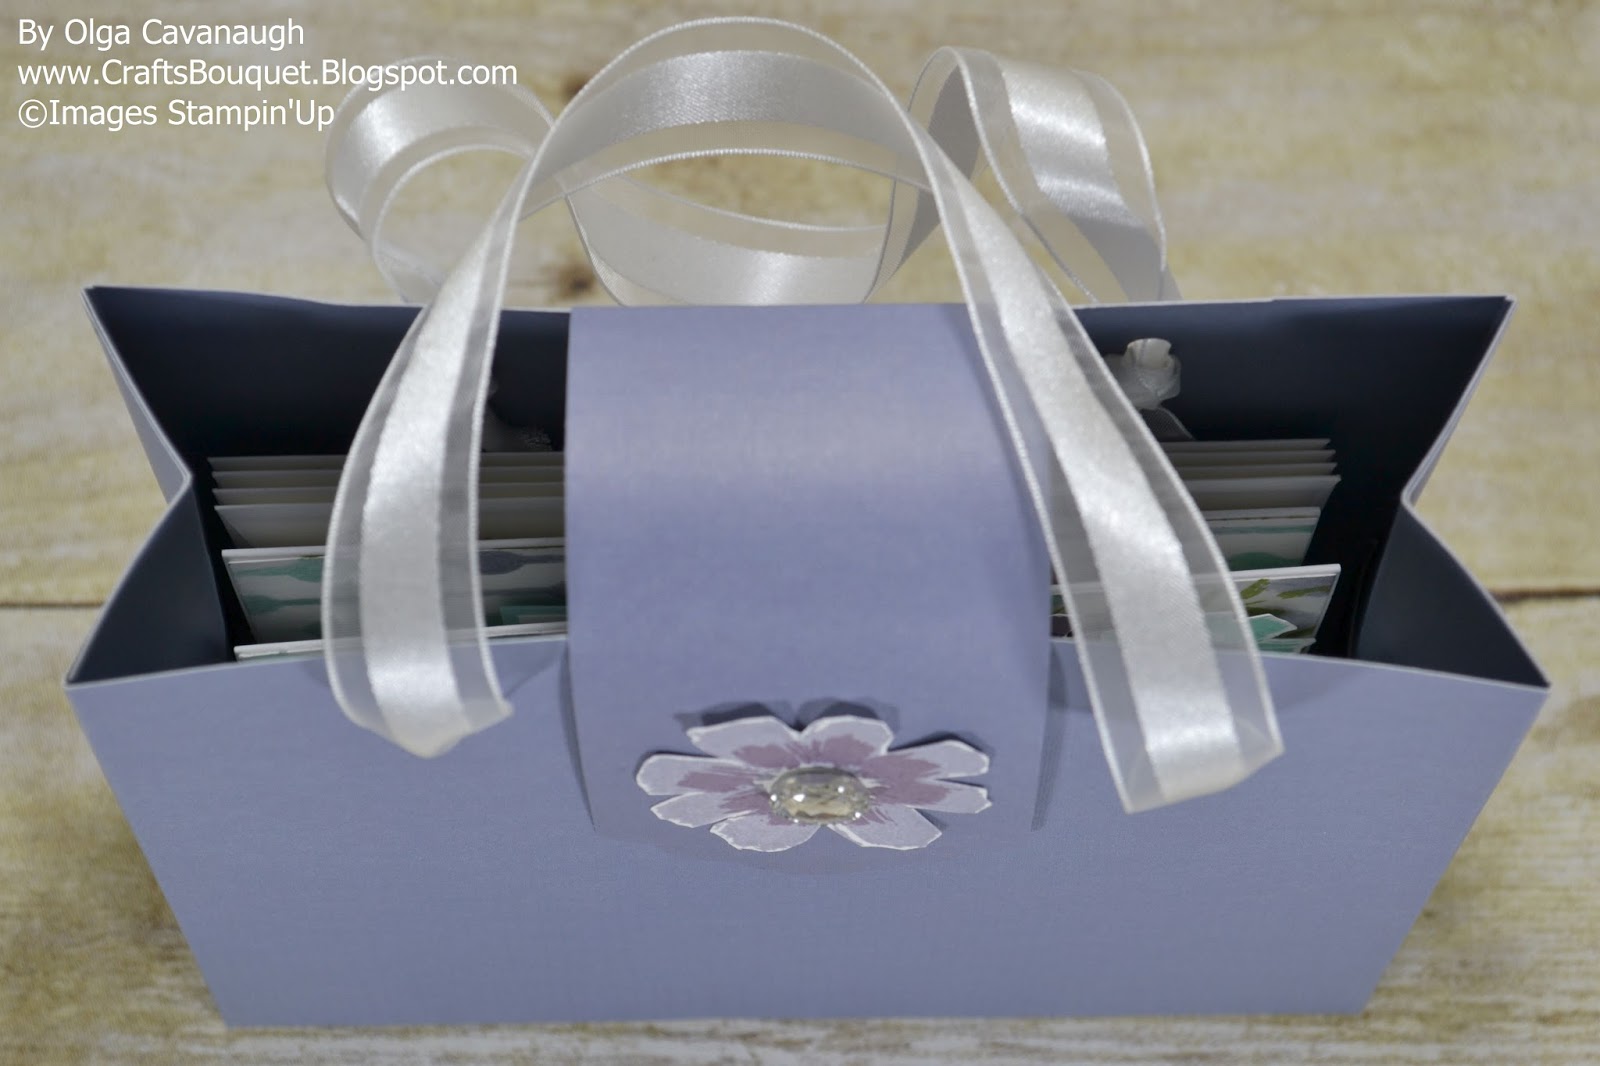
Today I am sharing a set of note cards and a gift bag made with the Paper Pumpkin All About Everything stamp set. This stamp set was a surprise gift for subscribers to celebrate Paper Pumpkin 3rd anniversary! I really love this stamp set, it has a variety of sentiments for most common occasions and beautiful flower images that can be used alone or layered.
Please watch the video from Stampin'Up Paper Pumpkin, to show you this stamp set and some ideas.

The All About Everything stamp set is so versatile, I love the font on the sentiments, the flowers and foliage images, this is one of my favorites! Here are some more ideas I came out with !


The Gift Bag finished size is 5" tall X 6" wide X 2" depth

I hope you liked this project, if you would like to subscribe to Paper Pumpkin or would like to learn more about this fun monthly kits, please visit the Paper Pumpkin Website Here . Choose a Demonstrator or I will be happy if you chose me as your Stampin'Up Demonstrator: Olga Cavanaugh.
Thank you so much for visiting and Have a Wonderful Day!


Thursday, April 21, 2016

Paper Pumpkin April 2016 Lovely Little Wreath Alternatives

Hello and Welcome to my Blog,
Today I am sharing the Paper Pumpkin April 2016 Lovely Little Wreath project alternative. But first here is the video tutorial for this project kit.

 I really love the way the little wreath looks just as they designed it, however I wanted to add just a little color by using the minimum extra supplies, so this is what I came out with.


The kit includes supplies to make 6 gift tags and 4 frame tags, I decided to make a box to store the tags, see below for instructions to build this box.


The Box finished size is 3-3/4 wide X 2-1/2 tall and 1-1/4 depth

Box instructions:
I used the Envelope Punch Board first 1) Trim your paper to 7″ x 7″ and line up the top left corner of your paper to the 3″ mark on the board (DON'T PUNCH) Score your paper  and rotate it counter clockwise 90 degrees. Line up the score line you just made with the score guide and score. Repeat this until you’ve score all four sides of the paper.
2) After you finish scoring the fourth side, scoot the top left corner of the paper to the 2″ mark on the board and score. Rotate the paper 90 degrees counter clockwise, line up the score line you just made with the score guide and score again. (Be sure you use the newest score line and not the previous ones when aligning your paper with the score guide.)
3) Repeat the scoring process until all four sides are scored. You should now have 8 score lines on your paper.
 Cut your scored paper as shown in the photo below to create a box template. Round the corner of what will be the top panel (the panel without any tabs).
Now is time to stamp your box template then place adhesive on the tabs and assemble the box.

This month's Paper Pumpkin included an extra set of Stamps for Subscribers called "All About Everything" , please come back and visit my blog to see what I have created with this stamp set :)
I hope you like this project as much as I do.  If you would like to Subscribe to Paper Pumpkin and join the Fun please click HERE. Chose a demonstrator or I will be so happy if you can pick me as your demonstrator: Olga Cavanaugh.
Thank you so much for visiting and Have a Wonderful Day!

Tuesday, April 12, 2016

Stampin'Up Mother's Day Gift Set

Hello and Welcome to my Blog,
Today I would like to share with you a Mother's Day Gift set made with the Stampin'Up Have A Cuppa Suite. This collection has all you need to create amazing and unique gift sets to celebrate Moms, Sisters, and Friends!
The Tea cups and kettles as well as the little spoons and tiny lemon slices are super cute and perfect to embellish any project. I created a gift set that includes a Tea towel, Assorted Tea packets and a set of 4 Note Cards with Envelopes.
This is a square box with lid that measures 6-1/2 X 6-1/2 finished. You can watch a video tutorial by Pootles HERE to learn how to make this box. On my box I just changed the scoring to be at 2-3/4.

I added dividers to separate the items and to have them more organized. 
Top Divider: Cut a piece of card stock 5-1/4 X 9-1/2 and score on long side at 2-1/2, 4, 5-1/2. 
Bottom Divider: Cut a piece of card stock 4-1/2 X 6-1/2 and score on short side at 1/2, 2, 3-1/2.


The Tea holders were made with the Envelope Punch Board. My tea packets needed an envelope size 3-1/4 X 2-3/4. I cut a piece of Designer Series Paper 5X5 inches and scored it at 2-1/4 to build the little envelope.

The following are the 4 note cards. I kept them as simple as possible but yet showcasing as many of the elements in this collection, also they fit perfectly fine in the envelopes.


Supplies Used:
A Nice Cuppa Bundle #141074
Have a Cuppa Designer Series Paper # 140567
Bermuda Bay 1/8" Stitched ribbon # 140569
Have a Cuppa Embellishments # 140570
Have a Cuppa card stock pack # 140568
Note Card and Envelopes Whisper White # 131527
Sequin Trim Bermuda Bay # 137910
White Embossing Powder
Whisper White Bakers twine
Oval Collection Framelits # 129381
Gift Bow Bigz # 129977
Rhinestone Basic Jewels # 119246
Bermuda Bay Ink pad
Melon Mambo Ink pad
Wisteria Wonder Ink pad

I hope you liked this gift set and found some inspiration to create your own. I am planning to make more sets like this using other coordinating colors and I hope my recipients like them as much as I do :)
If you would like to shop for any of the Stampin'Up supplies used in this project please visit my website HERE.
Thank you so much for visiting and Have a Wonderful Day!

Thursday, March 24, 2016

Paper Pumpkin March 2016 - Pocketful of Cheer Alternatives

Hello and Welcome to my Blog!
Today I am so excited to share with you The Paper Pumpkin Kit Pocketful of Cheer. I absolutely love the color combination in this kit, Bermuda Bay, Soft Sky, Cucumber Crush,  so fresh and modern. I am planning to give away this as a gift and I wanted to include a couple of different occasion cards and gift card pockets therefore I created these alternatives using a few extra Stampin'Up supplies.

This is the Fun Kit with all the supplies and instructions.


 The following pictures are some Alternatives.


Extra Stampin'Up supplies used :
Flower Medallion Punch
Baby's First Framelits Dies
Cucumber Crush Stampin'Pad
Bermuda Bay Card Stock

If you would like to Subscribe to Paper Pumpkin or learn more about it please go to the website HERE. Select a Demonstrator or you can select me (Olga Cavanaugh) as your demonstrator :)
Stampin'Up has a special offer until March 31 please see below for details. Don't miss this opportunity !! Not only you will save you will get a Free item from the Sale-A-Bration promotion ! Also if you Subscribe before April 10th Paper Pumpkin kits will include an extra stamp set Surprise for subscribers and in celebrating the 3rd anniversary of Paper Pumpkin!

Please let me know if you have any questions or write me a comment below!
Thank you so much for visiting and Have a Wonderful Day!

Thursday, March 17, 2016

Stampin'Up Rose Garden Shadow Box Wedding Card and Box

Hello and Welcome to my Blog!
On this post I am sharing a Shadow Box Wedding Card and Box made with the Rose Garden Thinlits dies and the Timeless Textures stamp set.
See below for Box assembly instructions.

The Shadow Box Card finished size is 7-1/8 x 4-1/2
I followed the tutorial by Amanda Bates click Here to see her instructions on how to assemble this Shadow Box Card base.
On a separate piece of Whisper White card stock cut at 6" X 3-3/4"  I stamped ramdomly with the Timeless Textures stamp set and Wisteria Wonder ink all around the edges to create a background. I cut the two rose pieces from the Rose Garden Thinlits dies in Whisper White card stock and glued them on the frame of the shadow box. I added some Dazzlign Diamonds stampin glitter to both rose cuts.


Box assembly Instructions:
Cut a piece of white card stock at  9"X12"
Score on long side at  5, 5-3/4, 10-3/4, and 11-1/2
Score on short side at  3/4, 7-7/8, 8-5/8

This Shadow Box Card looks difficult however it goes really easy once you assemble the base, and the results are amazing!
I hope you found some inspiration with this project and decide to make your own Shadow Box Cards, and wow your recipients by using Stampin'Up products which make these projects so Unique!
If you would like to shop for any of the products used on this project please visit my Website HERE.
Please let me know if you have any questions about this project or write me a comment below.
Thank you so much for visiting and Have a Wonderful Day!

Wednesday, March 16, 2016

Stampin'Up Market Fresh Thank You Gift Set

Hello and Welcome to my Blog!
Today I would like to share with you a Thank You Gift Set made with the Stampin'Up Market Fresh stamp set and the Berry Basket die.

The Strawberry picking season at our local market starts on February and it goes until May. It has been so amazing this year! I decided to pack some fresh strawberries and bring to my family and friends, and what a fantastic way to do this by using the Stampin'Up Berry Basket die and coordinating Designer Series Papers!
To build the basket I used the Stampin'Up Berry Basket die and Kraft card stock for the base, Cherry Cobbler card stock for the scallop border, 2-1/2 squares cut from the Farmers Market Designer Series Paper to decorate.

I made this card to complement the basket.  I used the Market Fresh stamp set and Farmers Market designer series paper, I stamped image on Shimmery White paper and used the Aqua Painters to watercolor it. The colors I used are Cherry Cobbler, Old Olive and Soft Suede. The image fits perfect on the 2-1/2 circle punch and I cut an extra layer of Cherry Cobbler with the Circles framelits. The Apothecary Accent die is retired; however you can substitute by using one of the Deco Labels framelits. I used the Softly Falling Embossing folder on the first layer of Very vanilla card stock to blend in with the soft dots on the designer series paper background.
Other supplies used are: Burlap ribbon, Antique Brads, Woodgrain embossing folder, Clothespins.


 Stampin'Up products really make gift packaging so attractive and unique, I really enjoyed making these projects and I hope the gift recipients like them too!
I also hope you liked these projects and found some inspiration to make your own gift sets, if you would like to shop for any of the Stampin'Up products used here please visit my Website HERE.
Remember the Sale-A-Bration period ends on March 31, 2016. For every $50 purchase you earn a FREE item from the SAB brochure and the Extra SAB brochure. Don't Miss it!

Please contact me if you have any questions about this projects or write me a comment below :)
Thank you so much for visiting and Have a Wonderful Day!


Tuesday, March 15, 2016

Paper Pumpkin February 2016 Alternatives

Hello and Welcome to my Blog!
Today I want to share with you another set of cards made with the Paper Pumpkin February 2016 Kit.
This kit has all the supplies to make 9 beautiful cards and it also includes the 9 envelopes which are pre printed with patterns as the liners and a fabulous frame for the front of envelope, so unique!


This time I wanted to create some "Alternatives", for those of you who might have extra Stampin'Up supplies this is what I came out with. 


For these alternatives I used the following extra Stampin'Up supplies:
Blackberry Bliss card stock
Soft Sky card stock
Tangerine Tango card stock
Rose Garden Thinlits dies
White Bakers Twine
Timeless Textures stamp set
Flower Medallion Punch
Pansy Punch
Lots of Labels Framelits
Bold Butterfly Framelits
Basic Pearls
If you would like to order any of these supplies please visit my Stampin'Up website HERE.

Paper Pumpkin has a special offer until March 31, 2016, see below for details!

If you would like to Subscribe to Paper Pumpkin please click HERE. Choose a Demonstrator or you can choose Me as your Demonstrator :)
Please contact me if you have any questions.
Thank you so much for visiting and have a Great Day!